My April Art Newsletter is out...you can read it following the link below:
April Art News from Corina S. Alvarezdelugo
Want to have the next issue delivered directly to your Inbox? Just click on the "Join Our Mailing list" label, at the bottom left margin in the newsletter. Already on my emailing list? I invite you to please UPDATE YOUR PROFILE by clicking on the link at the Join my Mailing List button. Please, sign up for one or more of the lists I offer, as I'm trying to organize my mailings according to interests. You can also unsubscribe at any time if you no longer wish to receive my communications. I only ask that you take a minute to let me know what I'm doing wrong, so I can make it better in the future. Thank you!!
If you have enjoyed this newsletter, I encourage you to share it with anyone and everyone. I'm trying to build a bigger audience for my work and art classes, and can only succeed with the help of friends like you. Thank you!
Enjoy!
23.3.12
How well do you see color?
When I went to design school, a way back, I took a Color class, the old fashion way, that is. In the sense that I had to mix my own colors by hand -not on Photoshop- starting from the primary colors. So I thought, that's easy, those colors that cannot be made from other colors (primary) are blue, red and yellow, right? As it turned out that was not completely true.
There are Additive Primary Colors of light, that when mixed together produce white, which are red, green and blue.
..and the Subtractive Primary Colors: Cyan, Magenta, and Yellow, that when mixed in equal parts, as all the light is subtracted, they make black. Subtractive color mixing is more complex than the additive color mixing you get with colored spotlights (as seen in the image above).
This was only the beginning of an enlightening class for me, as I learned to actually SEE color, by mixing the subtractive primaries: Cyan, Magenta and Yellow in different proportions, using eyedroppers to control the amount of pigment in each mixture.
We also combined the resulted colors with black, or white or with the gray scale (by mixing white and black in different proportions to go from white to black). And learned that, when colors are combined with white or black we create tints (lighter tones) and shades (darker hues) of these colors.
This tedious exercises of mixing colors, over and over again, drop by drop, sharpened the way I see colors now. It actually made me aware of the colors within a color. So I really recommend this kind of exercises if you're an artists, painter, designer, or decorator... Take some time to learn to see color, and the best way is by practicing mixing colors together by hand and experience for yourself the changes in a color when adding a few drops of another color and so forth.
Just recently, one of my good friends had a bunch of paint color swatches and challenged me to work with them for the fun of it. I immediately jumped to the opportunity. I picked three swatches with different shades of grays. One was black and white with a hint of blue, the other one had a hint of green and the third one had a hint of red. My friend suggested to create curvy lines overlapping each other on a piece of paper. The challenge was to try to mimic the colors picked from the swatches, as each one should have a different color value.
I worked with Acrylic paint on paper, and my palette included Payne's Grey, Mars Black, Ivory Black, Titanium White, Hookers Green and Cadmium Red Hue.
... but still looked too flat to me, so I detached the dried paint from my palette carefully and glued it to areas of the painting. This gave it the effect of actually having splashed some of the paint on top of the painting, giving it a 3-D effect.
What I like about this process is that there, in the palette, are all of the shades as I was mixing the colors together, mimicking the mesh like design. So it adds an extra layer to capture the eye of the viewer.
I really enjoyed going back to color basics with this exercise, and I'm sure you will too! So try it and share with me your results...
In the meantime, I invite you to take this fun and interesting ONLINE COLOR CHALLENGE. Enjoy!
There are Additive Primary Colors of light, that when mixed together produce white, which are red, green and blue.
 |
| Additive Primary Colors |
 |
| Subtractive Primary Colors |
 |
| One of the many color exercises I did during the Color class |
 |
| Grey Scale |
~~~*~~~
Just recently, one of my good friends had a bunch of paint color swatches and challenged me to work with them for the fun of it. I immediately jumped to the opportunity. I picked three swatches with different shades of grays. One was black and white with a hint of blue, the other one had a hint of green and the third one had a hint of red. My friend suggested to create curvy lines overlapping each other on a piece of paper. The challenge was to try to mimic the colors picked from the swatches, as each one should have a different color value.
 |
| Here are the three swatches I chose (I checked the values I used for you to see) |
 |
| My working table. I made zen-doodle like lines with spirals inside. |
 |
| Finished painting my greys. |
 |
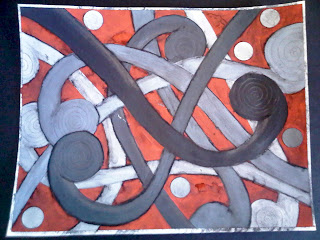
| Added a contrasting color to the background using the Cadmium Red Hue, that was also used in some of my gray hues... and of course my circles had to show up too, so I glued a few swatches circles here and there! |
The final product resulted too flat for me, so I then went ahead and shaded the lines to add dimension to the painting by using graphite, charcoal, and a Stabilo's Aquarellable pencil in black (got a love those pencils)
 |
| A little bit of water and voila! |
What I like about this process is that there, in the palette, are all of the shades as I was mixing the colors together, mimicking the mesh like design. So it adds an extra layer to capture the eye of the viewer.
To finish it up, I glued the painting to foam core and overlapped it to another piece of foam core that I had previously cover with grey-wash pages from an old encyclopedia.
 | ||
| IT'S COMPLICATED! 15.5 x 19.5 inches mixed media on paper (c) Corina S. Alvarezdelugo |
In the meantime, I invite you to take this fun and interesting ONLINE COLOR CHALLENGE. Enjoy!
14.3.12
The 1st One-Day Encaustic Intensive Workshop at my new studio was great!
Last Saturday, I gave my first encaustic workshop in my new studio space, and it was great!!! I feel so blessed to be able to offer classes now and pass along a lifetime of accumulated knowledge in the arts field. This new space lends itself very well to all sorts of media experimentation and art creation, as I'm able to move the furniture around according to the media and/or technique I'm teaching. A dream come true, not only for me, but for the people that come to learn and enjoy this wonderful creative space.
In this way, my first students had a blast along with me!! It was an introduction to Encaustic Painting, VERSATILITY IN WAX. In this hands-on intensive workshop, they got the chance to explore the luminous beauty and versatility of encaustic art - painting with molten, pigmented beeswax. They learned the basics of this ancient technique that has evolved into one of the most versatile mediums available for artists today, offering many exciting and creative possibilities!
I taught my students about the basic materials and formulas used in encaustic, and we discussed safety procedures, supports, and grounds, along with a variety of tools and techniques for fusing. As well as demonstrations for glazing, transparencies, building up of texture, layering and scraping/scribing, alongside image transfer and how to embed collage elements. As shown in the pictures below...
And here's what my students did...
The end results...

Thanks to Cheilaugh Harvey for taking most of the pictures above!
I started a second intensive workshop this week that I have divided into two mornings, and here's what my students have done so far...
In this way, my first students had a blast along with me!! It was an introduction to Encaustic Painting, VERSATILITY IN WAX. In this hands-on intensive workshop, they got the chance to explore the luminous beauty and versatility of encaustic art - painting with molten, pigmented beeswax. They learned the basics of this ancient technique that has evolved into one of the most versatile mediums available for artists today, offering many exciting and creative possibilities!
 |
| Melting the encaustic paint |
 |
| Different torches, good for fusing along with the heat gun |
 |
| Mixed media materials, stamps, stencils and more.. |
 |
| The resources |
I taught my students about the basic materials and formulas used in encaustic, and we discussed safety procedures, supports, and grounds, along with a variety of tools and techniques for fusing. As well as demonstrations for glazing, transparencies, building up of texture, layering and scraping/scribing, alongside image transfer and how to embed collage elements. As shown in the pictures below...
 |
| Fusing with the heat gun. |
 |
| Demonstrating different techniques on how to incise and scrape the surface |
 |
| Transferring images into the wax |
 |
| Applying other media in this case, Pan Pastels |
 |
| Fusing powdered charcoal (Demo) |
 |
| My "Demos" |
And here's what my students did...
 |
| Layering |
 |
| Fusing the layers |
 |
| Layering |
 |
| Masking, scraping... |
 |
| Transferring images |
.JPG) |
| Pan pastels |
 |
| Using Mixed Media techniques with encaustic |
The end results...

 |
Thanks to Cheilaugh Harvey for taking most of the pictures above!
I started a second intensive workshop this week that I have divided into two mornings, and here's what my students have done so far...
 |
| And the fun begins... |
 |
 |
| Some of their works! |
 |
| The proud artist with her textural work! |
9.3.12
My Monthly e-Newsletter for March 2012
My March Art Newsletter is out...you can read it following the link below:
March Art News from Corina S. Alvarezdelugo
Want to have the next issue delivered directly to your Inbox? Just click on the "Join Our Mailing list" label, at the bottom left margin in the newsletter. Already on my emailing list? I invite you to please UPDATE YOUR PROFILE by clicking on the link at the Join my Mailing List button. Please, sign up for one or more of the lists I offer, as I'm trying to spread my mailings according to interests. You can also unsubscribe at any time if you no longer wish to receive my communications. I only ask that you take a minute to let me know what I'm doing wrong, so I can make it better in the future. Thank you!!
If you have enjoyed this newsletter, I encourage you to share it with anyone and everyone. I'm trying to build a bigger audience for my work and art classes and can only succeed with the help of friends like you. Thank you!
Enjoy!
Subscribe to:
Posts (Atom)